[ad_1]
Studying to solder is a vital step in leveling up your restore abilities, and it’s additionally your gateway to some actually superior maker tasks.
We’ll cowl the naked minimal you’ll have to get began, together with instruments and kit, security precautions, and naturally, some fundamental soldering abilities.
To get issues began, we’re going to wish a couple of specialty instruments. Don’t fear, you don’t have to interrupt the financial institution to get all the pieces you’ll want. We’ll lay out the entire fundamentals under.
This would possibly appear to be an imposing listing of instruments, however there are budget-friendly choices for the DIY restore fanatic. You may get this listing of instruments for beneath $100, and with a little bit creativity, perhaps even half that.
Whereas soldering will be intimidating, it’s fairly protected as long as we take correct precautions. First up, the iron itself.
Soldering irons can attain temperatures in extra of 400C (800F) so that you’ll wish to keep away from contact with the pores and skin and take into account any hearth hazards within the space. By no means stroll away from a sizzling iron!
On uncommon events, you’ll see solder ball up into tiny globules and bounce from the tip of your iron. These balls are normally sufficiently small to solidify whereas touring by the air, but it surely’s all the time a smart precaution to put on security glasses to guard your eyes.
This must also incentivize you to create an appropriate work space to your soldering tasks. Laborious picket surfaces are superb. Your extremely flammable Vicuna wool rug isn’t.
Final however not least, take into account air flow and fume extraction very rigorously. Whereas soldering, it’s possible you’ll be uncovered to poisonous chemical substances which may trigger something from average to extreme well being points with prolonged exposure. That is very true when you select to make use of leaded solder.
Industrial fume extractors can value 1000’s of {dollars}, however these are overkill for the typical hobbyist. Relying on what you’ve at residence, you may make one for subsequent to nothing.
Try our information for a DIY fume extractor that received’t break the financial institution.
Now that we’ve lined what you’ll want and what you shouldn’t do, let’s get on to the enjoyable stuff. We advocate beginning with through-hole parts as they’re simpler to see and deal with, making them superb for studying.
First, put together your venture by making a steady, hands-free workstation. Use what works for you, however a mixture of serving to arms and a soldering splint gives probably the most stability. This enables the free use of each arms, certainly one of which might be holding the iron and the opposite might be feeding within the solder.
Subsequent, place some flux on the contacts you’d prefer to solder.
Solder will move in the direction of copper, however copper develops a layer of oxidation when it comes into contact with air. Making an attempt to solder to oxidized copper leads to a weak and brittle connection. Flux fixes this by deoxidizing the copper contact and conserving oxygen away till the solder has an opportunity to bond with the copper.
With the parts in place and flux utilized, it’s time to activate the soldering iron and the fume extractor.
There are a lot of methods of testing to see if the iron is sizzling sufficient, however we advocate feeding among the solder to the tip. When it readily melts, you recognize the iron is prepared.
Lead-free solder will soften within the 200-220C (390-430F) vary and permits us to fuse parts in place ensuring they’ve a robust electrical connection. That is additionally an excellent time to speak about “tinning” the tip of an iron, one thing it is best to do in the beginning and finish of every soldering session.
Soldering iron suggestions have an iron plating that’s nice for outputting warmth, however they’re vulnerable to oxidation and corrosion. Solder is immune to each oxidation and corrosion so coating the tip with a little bit of solder or tip cleaner is an effective way of defending that weak iron-plated layer.
Let’s begin soldering! Apply your iron to the copper contact on the board and the part pin for a couple of seconds. The aim is to warmth the copper pad and the part pin evenly to allow them to settle for the solder. If the copper pad and pin are too chilly, the solder will simply ball up.
You’ll know when you’ve achieved it proper in case your solder kinds a large base on the board and easily tapers to a degree, form of like a Hershey’s Kiss—however with out the diabetes.
Now that we’ve efficiently added our solder level, we have to start cleansing. Flux is corrosive so we’ll wish to apply a little bit isopropyl alcohol to the board and clear the realm with a cotton swab. The flux we used could declare to be “no clear” however that’s not strictly true.
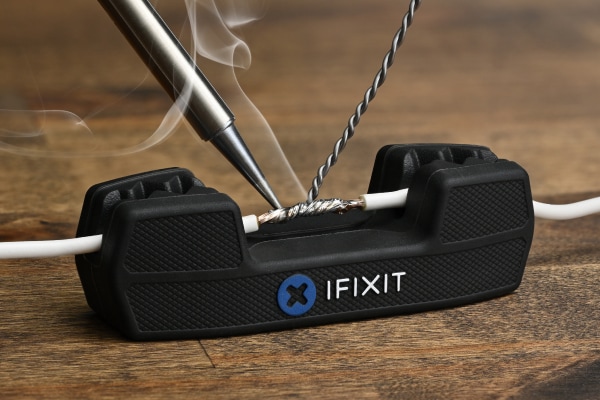
Now that you simply’ve made your first soldered connection let’s discuss how one can disconnect and take away it. Desoldering parts is actually the reverse of soldering, simply with barely completely different instruments.
As with soldering, to desolder a joint we have to warmth the copper braid and the solder we wish to take away evenly. Keep in mind after we talked about that solder is drawn to copper? Add a little bit flux to the braid to deoxidize it, place the braid over the solder and apply the iron on to the braid.
Similar to magic, the solder flows away from the board and into the copper braid. It’s that straightforward.
As with all the pieces in life, observe makes good. So listed below are a couple of suggestions that will help you in your studying journey:
We hope it will simply be the beginning of your soldering journey. Who is aware of, perhaps sometime quickly you’ll be upgrading the RAM in your ROG Ally or fixing MacBooks like a professional.
[ad_2]
Source link
